

Battery drainage prevention function
If a door or the rear gate (5-door) is not completely closed, the interior lights will remain illuminated as a result. However, several lights are automatically turned off by the battery drainage prevention function to prevent the battery from discharging.
The following interior lights are affected by this function.
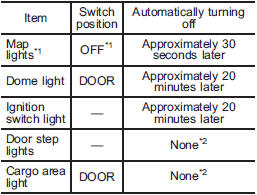
*1: The battery drainage prevention function affects only the map lights on models with the moonroof, and only when the map light switches are in the OFF position. The map lights on models without the moonroof do not turn off automatically, so push the light switches manually to turn them off.
*2: The door step lights and the cargo area light are not affected by the battery drainage prevention function, so the lights do not turn off automatically. To turn off the lights, it is necessary that each door and the rear gate (5- door) are completely closed.
The operational/non-operational setting of this function can be changed by a SUBARU dealer. Contact your SUBARU dealer to change the setting.
NOTE
• The factory setting (default setting) for this function is set as “operational”.
• When leaving the vehicle, please make sure that all doors and the rear gate (5-door) are completely closed.
• The battery drainage prevention function does not operate while the key is in the ignition switch.
See also:
Rear window wiper blade assembly (Outback)
1. Raise the wiper arm off the rear window.
2. Turn the wiper blade assembly counterclockwise.
3. Pull the wiper blade assembly toward you to remove it from the wiper arm. ...
Shift lock function
The shift lock function helps prevent the improper operation of the select lever.
● The select lever cannot be operated unless the ignition switch is turned to
the “ON” position and the brake ...
ECO gauge
1) U.S.-spec. models
2) Except U.S.-spec. models
The ECO gauge shows the difference between the average rate of fuel consumption
and the current rate of fuel consumption. Using the average rate ...