

Changing a flat tire
WARNING
● Do not jack up the vehicle on an incline or a loose road surface. The jack can come out of the jacking point or sink into the ground and this can result in a serious accident.
● Use only the jack provided with your vehicle. The jack supplied with the vehicle is designed only for changing a tire. Never get under the vehicle while supporting the vehicle with this jack.
● Always turn off the engine before raising the flat tire off the ground using the jack. Never swing or push the vehicle supported with the jack. The jack can come out of the jacking point due to a jolt and this can result in a serious accident.
1. Park on a hard, level surface, whenever possible, then stop the engine.
2. Apply the parking brake and shift the shift lever in reverse (MT models) or the select lever in the “P” (Park) position (AT and CVT models).
3. Turn on the hazard warning flasher and have everyone get out of the vehicle.
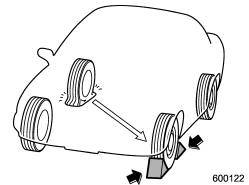
4. Put wheel blocks at the front and rear of the tire diagonally opposite the flat tire.
5. Take out the jack, jack handle and wheel nut wrench.
The tools and the spare tire are stored under the floor of the trunk (Legacy) or the cargo area (Outback). Refer to “Maintenance tools” F9-3.
NOTE
Make sure that the jack is well lubricated before using it.
Legacy
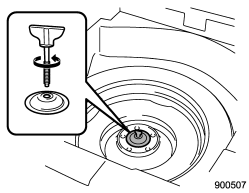
6. Take out the tool bucket and turn the attaching bolt counterclockwise, then take the spare tire out.
NOTE
If the spare tire provided in your vehicle is a temporary spare tire, carefully read “Temporary spare tire” F9-2 and strictly follow the instructions.
7. Loosen the wheel nuts using the wheel nut wrench but do not remove the nuts.
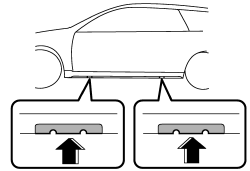
8. Place the jack under the side sill at the front or rear jack-up point closest to the flat tire.
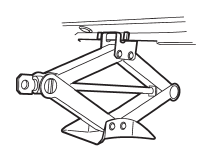
Turn the jackscrew by hand until the jack head engages firmly into the jack-up point.
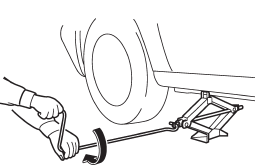
9. Insert the jack handle into the jackscrew, and turn the handle until the tire clears the ground. Do not raise the vehicle higher than necessary.
10. Remove the wheel nuts and the flat tire.
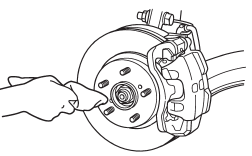
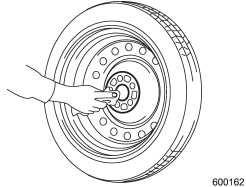
11. Before putting the spare tire on, clean the mounting surface of the wheel and hub with a cloth.
12. Put on the spare tire. Replace the wheel nuts. Tighten them by hand.
WARNING
Do not use oil or grease on the wheel studs or nuts when the spare tire is installed. This could cause the nuts to become loose and lead to an accident.
13. Turn the jack handle counterclockwise to lower the vehicle.

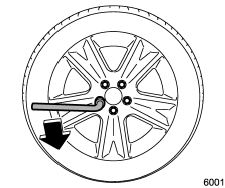
14. Use the wheel nut wrench to securely tighten the wheel nuts to the specified torque, following the tightening order in the illustration.
For the wheel nut tightening torque, refer to “Tires” F12-8. Never use your foot on the wheel nut wrench or a pipe extension on the wrench because you may exceed the specified torque. Have the wheel nut torque checked at the nearest automotive service facility.
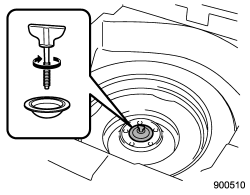
15. Store the flat tire in the spare tire compartment.
Put the spacer and tighten the attaching bolt firmly.
Also store the jack and jack handle in their storage locations.
WARNING
Never place a tire or tire changing tools in the passenger compartment after changing wheels. In a sudden stop or collision, loose equipment could strike occupants and cause injury. Store the tire and all tools in the proper place.
See also:
5-door models
1. Lower the head restraints.
2. Unlock the seatback by pulling the release knob and then fold the seatback down.
To return the seatback to its original position, raise the seatback until it locks ...
Tire size
Your vehicle comes equipped with P-Metric tire size. It is important to understand the sizing system in selecting the proper tire for your vehicles. Here is a brief review of the tire sizing system wi ...
Choosing a child restraint system
Choosing a child restraint system
Choose a child restraint system that is appropriate for the child’s age and size (weight and height) in order to provide the child with proper protection. The child ...