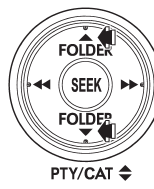
Subaru Outback (BR): Folder selection

Press the “ ” side of the “FOLDER”
button briefly to select the next folder.
Press the “ ” side of the button briefly
to go back to the previous folder.
NOTE
● Selecting folders in this way is possible only within a single disc.
● Only MP3/WMA/AAC folders are recognized when an attempt to select the next or
previous folder is made. If no appropriate folder exists on the disc, pressing the
“ ” or “
 ”
”
side of the “FOLDER” button starts playback beginning with the first track/file
(track).
READ NEXT:
 How to eject a CD from the player (type A)
When a disc is being played back or when a disc is in the player, press the eject
button “”. The disc will be ejected.
NOTE
● Avoid driving the vehicle with a CD sticking out, because
 How to eject CDs from the player (type B)
NOTE
● Avoid driving the vehicle with a CD sticking out, because vibration might make
it fall out.
● If you do not remove the ejected disc within approximately 15 seconds, a disc
pro
 Ejecting a CD from the player
Disc select buttons
1. Use the disc select button to select the disc to be ejected.
2. Briefly press the “” button. The
selected disc will be ejected. The disc number indicator will flash
SEE MORE:
 To increase the speed (by the “RES/ SET” switch)
Press the “RES/SET” switch to the “RES” side and hold it until the vehicle reaches
the desired speed. Then, release the switch. The vehicle speed at that moment will
be memorized and treated as the new set speed.
U.S.-spec. models
When the difference between the actual vehicle speed
 Clutch Switch
A: REMOVAL
1) Disconnect the ground cable from battery.
2) Remove the instrument panel lower cover. <Ref.
to EI-64, REMOVAL, Instrument Panel Lower Cover.>
3) Disconnect the connector from clutch switch.
4) Remove the clutch switches.
B: INSTALLATION
1. CLUTCH SWITCH
1) Move the clevis pin
© 2010-2024 Copyright www.suoutback.com

