Subaru Outback (BR): To hook the top tether
CAUTION
Always remove the head restraint when mounting a child restraint system with a top tether. Failure to do so may prevent the top tether from being fastened tightly.
Outback
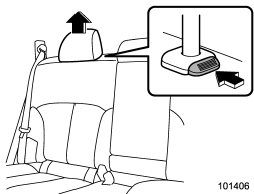
1. Remove the head restraint at the seating position where the child restraint system has been installed with the seatbelt or lower anchorages; lift up the head restraint while pressing the release button. Store the head restraint in the cargo area. Avoid placing the head restraint in the passenger compartment to prevent it from being thrown around in the passenger compartment in a sudden stop or a sharp turn.
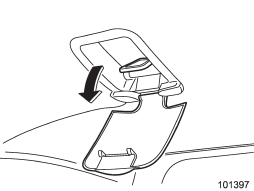
2. Open the cover flaps to use the anchorages.
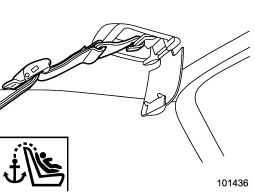
3. Fasten the top tether hook of the child restraint system to the appropriate upper anchorage.
4. Tighten the top tether securely.
READ NEXT:
 *SRS airbag (Supplemental Restraint System airbag)
*SRS: This stands for supplemental restraint system. This name is used because
the airbag system supplements the vehicle’s seatbelts.
Your vehicle is equipped with a crash sensing and diagnostic
Models with SRS airbags and lap/shoulder restraints for driver, front passenger,
and window-side rear passengers
Your vehicle is equipped with a supplemental restraint system in addition to
a lap/shoulder belt at each front seating position and each rear window-side seating
position. The supplemental restrai
Components
1) Front sub sensor (right-hand side)
2) Front sub sensor (left-hand side)
3) SRS airbag system warning light
4) Frontal airbag module (driver’s side)
5) Front passenger’s frontal airbag O
SEE MORE:
Gear position indicator setting (MT models)
The gear position indicator light can be activated or deactivated by performing
the following procedure.
1. Turn the ignition switch to the “LOCK” position.
2. Press the trip knob to show “ ” or “ ” on the trip meter display.
The display can be switched as shown in the following ill
Roof Molding
A: REMOVAL
CAUTION:
Be careful not to damage the body.
1) Remove the roof rail assembly. (OUTBACK model) <Ref. to EI-59, REMOVAL,
Roof Rail.>
2) Turn over the front end of roof molding.
3) Using a flat tip screwdriver, slide the internal clip in the direction of
arrow.
Right: Slide toward
