Subaru Outback (BR): Low beam light bulbs
Subaru Outback (BR) 2010-2015 Owners Manual / Maintenance and service / Replacing bulbs / Headlight / Low beam light bulbs
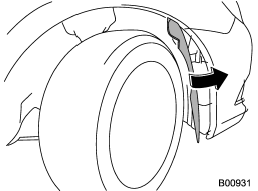
1. Pull off the fender lining. For details, refer to “Pulling off the fender lining” F11- 7.
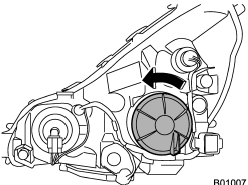
2. Remove the bulb cover, by turning it counterclockwise.
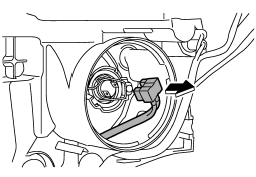
3. Disconnect the electrical connector.
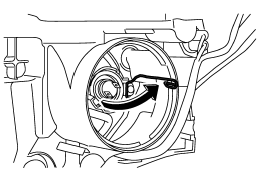
4. Remove the retainer spring.
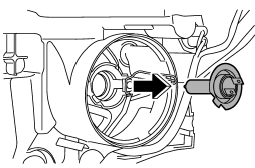
5. Replace the bulb, then set the retainer spring securely.
6. Reconnect the electrical connector.
7. Install the bulb cover.
8. After replacing the bulb, reattach the fender lining.
READ NEXT:
 High beam light bulbs
1. Remove the air intake duct (right-hand side). For the method to remove the
air intake duct, refer to “Removing air intake duct” F11-7.
Left-hand side
2. Use a screwdriver to remove the se
Front turn signal light
NOTE
It may be difficult to replace the bulbs. We recommend that you have the bulbs
replaced by your SUBARU dealer if necessary.
1. Turn over the protective cover of the engine compartment.
2
Front position light
1. Turn the socket counterclockwise and pull it out.
2. Pull out the bulb from the socket and replace the bulb with a new one.
SEE MORE:
How to insert a CD(s) (type B)
1. Briefly press the “LOAD” button. If the magazine in the player has an idle
position where you can insert a disc, the disc number indicator associated with
the idle position will blink.
If no indicator blinks, it means that there is no idle position in the magazine.
2. When the “LOAD
General Description of Automatic Transmission
A: SPECIFICATION
1. TORQUE CONVERTER CLUTCH
2. OIL PUMP
3. TRANSMISSION CONTROL ELEMENT
4. TRANSMISSION GEAR RATIO
5. PLANETARY GEAR AND PLATE
6. SELECTOR POSITION
7. HYDRAULIC CONTROL AND LUBRICATION
8. COOLING AND HARNESS
9. TRANSFER
10.FINAL REDUCTION GEAR
11.RECOMM
© 2010-2024 Copyright www.suoutback.com
