Subaru Outback (BR): Changing the coolant
WARNING
Never attempt to remove the radiator cap until the engine has been shut off and has cooled down completely. Since the coolant is under pressure, you may suffer serious burns from a spray of boiling hot coolant when the cap is removed.
Always add genuine SUBARU cooling system conditioner whenever the coolant is replaced.
Change the engine coolant and add genuine SUBARU cooling system conditioner using the following procedures according to the maintenance schedule in the “Warranty and Maintenance Booklet”.
1. Remove the under cover.
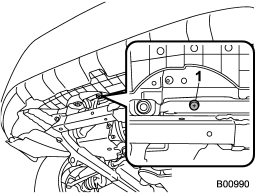
2.5 L models
1) Drain plug
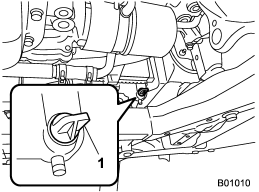
3.6 L models
1) Drain plug
2. Place a proper container under the drain plug and loosen the drain plug.
3. Loosen the radiator cap to drain the coolant from the radiator. Then drain the coolant from the reserve tank. Tighten the drain plug securely.
4. Install the under cover.
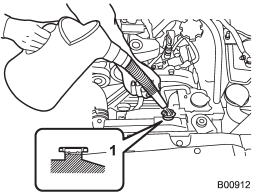
1) Fill up to here
5. Slowly pour the coolant and fill up to just below the filler neck, allowing enough room to add genuine SUBARU cooling system conditioner in the radiator. Add genuine SUBARU cooling system conditioner until the coolant level reaches the filler neck. Do not pour the coolant too quickly, as this may lead to insufficient air bleeding and trapped air in the system.
NOTE
For guidelines on coolant quantity (including the coolant in the reservoir tank), refer to “Engine coolant” F12-7.
CAUTION
● Be careful not to spill engine coolant when adding it. If coolant touches the exhaust pipe, it may cause a bad smell, smoke, and/or a fire. If engine coolant gets on the exhaust pipe, be sure to wipe it off.
● Do not splash the engine coolant over painted parts. The alcohol contained in the engine coolant may damage the paint surface.
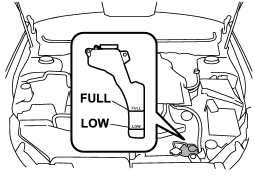
6. Pour the coolant and fill to the reservoir tank’s “FULL” level mark.
7. Put the radiator cap back on and tighten firmly. At this time, make sure that the rubber gasket in the radiator cap is correctly in place.
8. Start and race the engine at 2,000 to 3,000 rpm for 5 to 6 times within 40 seconds.
9. Stop the engine and wait until the coolant cools down (122 to 1408F [50 to 608C]). If there is any loss of coolant, add coolant to the radiator’s filler neck and to the reserve tank’s “FULL” level.
10. Put the radiator cap and reservoir cap back on and tighten firmly.
READ NEXT:
 Air cleaner element
WARNING
Do not operate the engine with the air cleaner element removed. The air cleaner
element not only filters intake air but also stops flames if the engine backfires.
If the air cleaner eleme
Replacing the air cleaner element
Replace the air cleaner element according to the maintenance schedule in the
“Warranty and Maintenance Booklet”. Under extremely dusty conditions, replace it
more frequently. It is recommended
Turbo models
1) Air intake duct 2) Air cleaner case 3) Clamp
1. Remove the hydraulic hose in the power steering system from the clip on the
air intake duct.
2. Remove the hydraulic hose from the clip on the
SEE MORE:
Electronic Brake Force Distribution (EBD) system
The EBD system maximizes the effectiveness of the brakes by allowing the rear
brakes to supply a greater proportion of the braking force. It functions by adjusting
the distribution of braking force to the rear wheels in accordance with the vehicle’s
loading condition and speed.
The EBD syst
DTC P0107, P0108, P0111, P0112, P0113, P0117, P0118, P0122, P0123, P0125,
P0126, P0128
P: DTC P0107 MANIFOLD ABSOLUTE PRESSURE/BAROMETRIC PRESSURE
CIRCUIT LOW INPUT
1. OUTLINE OF DIAGNOSIS
Detect the open or short circuit of intake manifold pressure sensor.
Judge as NG if out of specification.
2. COMPONENT DESCRIPTION
Output voltage
Absolute pressure
Connector
Terminals
O-
