Subaru Outback (BR): Changing the oil and oil filter
Change the oil and oil filter according to the maintenance schedule in the “Warranty and Maintenance Booklet”.
The engine oil and oil filter must be changed more frequently than listed in the maintenance schedule when driving on dusty roads, when short trips are frequently made, or when driving in extremely cold weather.
NOTE
Changing the engine oil and oil filter should be performed by a properlytrained expert. It is recommended that you have this service performed by your SUBARU dealer.
1. Warm up the engine by letting the engine idle for approximately 10 minutes to ease draining the engine oil.
2. Park the vehicle on a level surface and stop the engine.
3. Remove the oil filler cap.
2.5 L non-turbo models
2.5 L turbo models

3.6 L models
4. Drain out the engine oil by removing the drain plug while the engine is still warm. The used oil should be drained into an appropriate container and disposed of properly.
WARNING
Be careful not to burn yourself with hot engine oil.
5. Wipe the seating surface and around the drain plug with a clean cloth and tighten it securely with a new sealing washer after the oil has completely drained out.
2.5 L non-turbo models
2.5 L turbo models
3.6 L models
6. Remove the oil filter with an oil filter wrench.
7. Before installing a new oil filter, apply a thin coat of engine oil to the seal.
8. Clean the rubber seal seating area of the bottom of engine and install the oil filter by hand turning. Be careful not to twist or damage the seal.
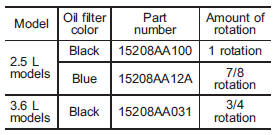
9. Tighten the oil filter by the amount indicated in the following table after the seal makes contact with the bottom of engine.
CAUTION
● Never over tighten the oil filter because that can result in an oil leak.
● Thoroughly wipe off any engine oil that has spilled over the exhaust pipe and/or under-cover. If left unremoved, the oil could catch fire.
10. Reinstall the cover under the oil filter.
11. Pour engine oil through the filler neck. For the oil capacity (guideline), refer to “Lubricants” F12-4. The necessary quantity of oil depends on the quantity of oil that has been drained. The quantity of drained oil differs slightly depending on the temperature of the oil and the time the oil is left flowing out. After refilling the engine with oil, therefore, you must use the level gauge to confirm that the level is correct.
12. Start the engine and make sure that no oil leaks appear around the filter’s rubber seal and drain plug.
13. Keep the engine idling until the engine reaches the normal operating temperature range, as indicated by the temperature gauge on the combination meter. After that, check the engine oil level again. For further details about the check procedure, refer to “Checking the oil level” F11-12.
READ NEXT:
 Recommended grade and viscosity
CAUTION
Use only engine oil with the recommended grade and viscosity.
NOTE
Engine oil viscosity (thickness) affects fuel economy. Oils of lower viscosity
provide better fuel economy. However, in
Synthetic oil
You should use synthetic engine oil that meets the same requirements given for
conventional engine oil. When using synthetic oil, you must use oil of the same
classification, viscosity and grade s
Cooling system
WARNING
Never attempt to remove the radiator cap until the engine has been shut off and
has cooled down completely. Since the coolant is under pressure, you may suffer
serious burns from a spray
SEE MORE:
Clutch Switch
A: REMOVAL
1) Disconnect the ground cable from battery.
2) Remove the instrument panel lower cover. <Ref.
to EI-64, REMOVAL, Instrument Panel Lower Cover.>
3) Disconnect the connector from clutch switch.
4) Remove the clutch switches.
B: INSTALLATION
1. CLUTCH SWITCH
1) Move the clevis pin
Exterior
1) Engine hood lock release (page 11-7)
2) Headlight switch (page 3-28)
3) Bulb replacement (page 11-48)
4) Wiper switch (page 3-32)
5) Moonroof (page 2-28)
6) Roof rail (page 8-14)
7) Door locks (page 2-4)
8) Tire pressure (page 11-35)
9) Flat tires (page 9-6)
10) Fog light switch (page
