Subaru Outback (BR): Engine hood
To open the hood:
1. If the wiper blades are lifted off the windshield, return them to their original
positions.

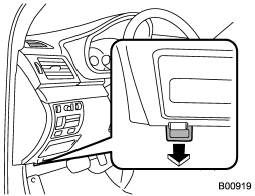
2. Pull the hood release knob under the instrument panel.

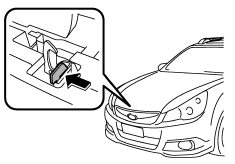
3. Release the secondary hood release by moving the lever between the front grille
and the hood toward the left.
4. Lift up the hood.
To close the hood:
1. Lower the hood to a height of approximately 5.9 in (15 cm) above its closed
position and then let it drop.
2. After closing the hood, be sure the hood is securely locked.
If this does not close the hood, release it from a slightly higher position.
Do not push the hood forcibly to close it. It could deform the metal.
WARNING
Always check that the hood is properly locked before you start driving. If it
is not, it might fly open while the vehicle is moving and block your view, which
may cause an accident and serious bodily injury.
READ NEXT:
1) Power steering fluid reservoir (page 11-27)
2) Manual transmission oil level gauge (MT) (page 11-23)
3) Clutch fluid reservoir (page 11-29)
4) Brake fluid reservoir (page 11-28)
5) Fuse box (
1) Power steering fluid reservoir (page 11-27)
2) Manual transmission oil level gauge (page 11-23)
3) Clutch fluid reservoir (page 11-29)
4) Brake fluid reservoir (page 11-28)
5) Fuse box (page
SEE MORE:
Foreword
HOW TO USE THIS MANUALS
1. STRUCTURE
Each section consists of SCT that are broken down into SC that are divided into sections for each component.
The specification, maintenance and other information for the components are included, and the diagnostic information has also been added where ne
A: REMOVAL
1) Lift up the vehicle, and then remove the front wheels.
2) Remove the left and right stabilizer brackets.
3) Remove the ball joint.
Extract the cotter pin (a) from the ball stud.
Remove the castle nut (b).
Extract the ball stud from the front arm.
Remove the bolt securing the bal
© 2010-2024 Copyright www.suoutback.com


