Subaru Outback (BR): Changing the batteries
CAUTION
● Do not let dust, oil or water get on or in the remote engine start transmitter when replacing the battery.
● Be careful not to damage the printed circuit board in the remote engine start transmitter when replacing the battery.
● Be careful not to allow children to touch the battery and any removed parts; children could swallow them.
● There is a danger of explosion if an incorrect replacement battery is used. Replace only with the same or equivalent type of battery.
● Batteries should not be exposed to excessive heat such as sunshine, fire or the like.
The two 3-volt lithium batteries (model CR-2032) supplied in your remote engine start transmitter should last approximately one year, depending on usage. When the batteries begin to weaken, you will notice a decrease in range (distance from the vehicle that your remote control operates). Follow the instructions below to change the remote engine start transmitter batteries.
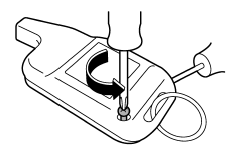
1. Remove the small Phillips type screw located on the back side lower left corner of the transmitter.
2. Carefully pry the remote engine start transmitter halves apart using a small flathead screwdriver.

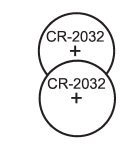
3. Remove the circuit board from the bottom half of the case and remove the batteries and replace with new ones. Be sure to observe the (+) sign on the old batteries before removing them to ensure that the new batteries are inserted properly (battery “+” should be pointed away from the transmitter circuit board on both batteries).
4. Carefully snap the case halves back together, reinstall the Phillips type screw and test the remote engine start system.
NOTE
● This device complies with Part 15 of the FCC Rules and with RSS-210 of Industry Canada. Operation is subject to the following two conditions: (1) This device may not cause harmful interference, and (2) this device must accept any interference received, including interference that may cause undesired operation. Changes or modifications not expressly approved by the party responsible for compliance could void the user’s authority to operate the equipment and void warranty.
● To comply with the FCC RF exposure compliance requirements, no change to the antenna or the device is permitted. Any change to the antenna or the device could result in the device exceeding the RF exposure requirements and void user’s authority to operate the device.
READ NEXT:
 Manual transmission
WARNING
● Do not drive the vehicle with the clutch disengaged (i.e., when the clutch
pedal is depressed) or with the shift lever in the neutral position. Engine braking
has no effect in eit
Selecting reverse gear
CAUTION
Shift into reverse ONLY when the vehicle has completely stopped. It may cause
damage to the transmission to try shifting into reverse when the vehicle is moving.
1) Slider
You must rais
SEE MORE:
Air Conditioning System
A: WIRING DIAGRAM
Refer to "Air Conditioning System" in the wiring diagram. <Ref. to WI-53,
WIRING DIAGRAM, Air Conditioning
System.>
B: ELECTRICAL SPECIFICATION
Refer to "Auto A/C Control Module I/O Signal" of "HVAC SYSTEM (DIAGNOSTICS)"
section. <Ref. to AC(diag)-
6, ELECTRICAL SPECIFIC
Seat Heater System
A: REMOVAL
1. SEAT HEATER UNIT
1) Remove the front seats. <Ref. to SE-10, REMOVAL, Front Seat.>
2) Remove the backrest cover of front seat and seat cushion cover. <Ref. to
SE-12, DISASSEMBLY, Front
Seat.>
3) Remove the seat heater unit.
2. SEAT HEATER SWITCH
1) Disconnect the ground
