Subaru Outback (BR): Convex mirror (passenger side)
WARNING
Objects look smaller in a convex mirror and farther away than when viewed in a flat mirror. Do not use the convex mirror to judge the distance of vehicles behind you when changing lanes. Use the inside mirror (or glance backwards) to determine the actual size and distance of objects that you view in convex mirror.
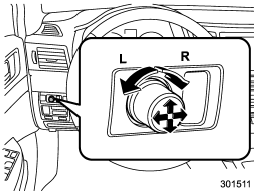
Remote control mirror switch

The remote control mirrors operate only when the ignition switch is in the “ON” or “Acc” position.
1. Turn the knob to the “L” side to adjust the left-hand mirror or to the “R” side to adjust the right-hand mirror.
2. Move the knob in the direction you want to move the mirror.
3. Return the knob to the neutral position to prevent unintentional operation.
The mirrors can also be adjusted manually.

