Subaru Outback (BR): Rear view image display
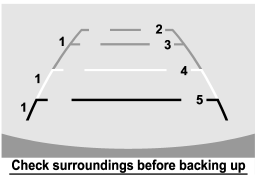
When the ignition switch is in the “ON” position and the transmission is in the “R” (reverse) position, the rear view camera automatically displays the rear view image behind the vehicle on the inside mirror. Also, the following help lines are indicated as a guide to help you realize the actual distance from the display.

1) Vehicle width line (oblique vertical line) 2) Approx. 10 feet (3 m) from the bumper (green horizontal line) 3) Approx. 6.5 feet (2 m) from the bumper (green horizontal line) 4) Approx. 3 feet (1 m) from the bumper (yellow horizontal line) 5) Approx. 1.5 feet (0.5 m) from the bumper (red horizontal line)
By pressing the power button while the transmission is in the “R” (reverse) position, the rear view image display toggles to the on or off mode.
Once the rear view image display is set to the off mode, the display stays in the off mode, with the function indicator in orange, every time the transmission is shifted into the “R” (reverse) position. If the ignition switch is turned to the “OFF” position, the display setting returns to the on mode as a default setting the next time the ignition switch is turned to the “ON” position.
Language mode change
The language mode of the captions on the rear view image display is selectable in English or French in the following ways.
1. Press and hold the power button for 6 to 12 seconds while the transmission is in the “R” (reverse) position, and then release it. The display will enter the language selection mode.
2. Briefly press the power button to toggle the captions on the display in English or French.
3. By releasing the power button for 5 seconds, the display blinks one time to show that the language mode is selected.
Non-operational mode
The rear view image display can be set as non-operational. After setting the display to the non-operational mode, the display does not show the rear view image even if the ignition switch is reset (turning the ignition switch to the “ON” position after turning it to the “OFF” position).
To set the display to the non-operational mode, press and hold the power button for 12 to 15 seconds while the transmission is in the “R” (reverse) position, and then release it. The display is now in the nonoperational mode. After the display has been set to the non-operational mode, the function indicator will illuminate in orange while the transmission is in the “R” (reverse) position.
To return the display to the operational mode, press and hold the power button for 12 to 15 seconds again.
For precautions about the rear view camera and the rear view image, refer to “Rear view camera” F6-18.

