Subaru Outback (BR): Arming the system
CAUTION
In passive mode, the system will automatically activate the alarm but WILL NOT automatically lock the doors. In order to lock the doors you must either lock them as indicated in step 4 below or with the key once they have been closed. Failure to lock the doors manually will result in a higher security risk.
1. Turn the ignition switch to the “ON” position.
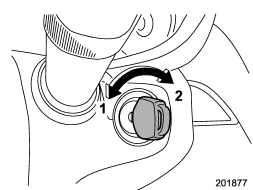
1) LOCK
2) ON
2. Turn the ignition switch from “ON” to “LOCK” position and remove the key from the ignition switch.
3. Open the doors and get out of the vehicle.
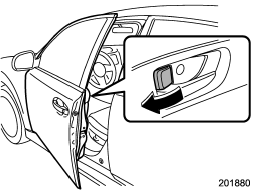
4. Before closing the doors, lock all doors with the inside door lock levers.
5. Close the doors. The system will automatically arm after 1 minute.
In the passive mode, the system can also be armed with the remote transmitter or with the power door locking switches. If the remote transmitter or power door locking switch is used to lock the vehicle, arming will take place immediately regardless of whether or not the passive mode has been selected.
Disarming the system
To disarm the system, briefly press the “ ”
”
button on the transmitter.
READ NEXT:
 Tripped sensor identification
The security indicator light flashes when the alarm system has been triggered.
Also, the number of flashes indicates the location of unauthorized intrusion or
the severity of impact on the vehicle
Shock sensors (dealer option)
The shock sensors trigger the alarm system when they sense impacts applied to
the vehicle and when any of their electric wires is cut. The alarm system causes
the horn to sound and the turn signal
Child safety locks
WARNING
Always turn the child safety locks to the “LOCK” position when children sit on
the rear seat. Serious injury could result if a child accidentally opens the door
and falls out.
Each
SEE MORE:
Vehicle Dynamics Control OFF indicator light
The light illuminates when the ignition switch is turned to the “ON” position
and turns off after approximately 2 seconds. The light illuminates when the Vehicle
Dynamics Control OFF switch is pressed to deactivate the Vehicle Dynamics Control
system.
The Vehicle Dynamics Control system
Map light bulb replacing
1. Remove the lens by prying the edge of the lens with a flat-head screwdriver.
2. Turn the bulb until the flat surfaces at its ends are aligned vertically. Pull the bulb straight downward to remove it.
3. Install a new bulb.
4. Reinstall the lens.
